|
The Art of Demomaking - Issue 07 - Bump Mapping by (04 October 1999) |
Return to The Archives |
Introduction
 |
| I suppose most of you were expecting this tutorial sooner or later. Well, here it is! The famous bump mapping explained, with a couple of tricks to get it running quickly. You'll also learn about the magic of look-up tables. And I'll take the opportunity to justify the use of greyscale modes in the future. |
|
The Theory Behind Bump Mapping
|
|
Bump mapping is a technique that makes a flat surface look like it has small bumps on it. Most of you are probably familiar with this technique since it has been quite popular over the past few months. Most 3D games will implement it in the near future. The main idea is that for each texture you also store a corresponding bump map. Some people use a greyscale version of the texture as a bump map. I have to say that looks a bit lame, but that's beside the point :) The bump map can be considered as a height map, which stores the altitude of each pixel. Of course in the case of a bump map, this altitude is really small. So for each point in the texture, we can now compute the angle of the slope it's on. So we can now tell which way the surface is facing (or for those of you that know about 3D graphics, replace that sentence by "So we can now determine the orientation of the surface normal at that point.") Given this data, we can compute how much light is actually hitting this part of the surface, and shade it. There are various different lighting techniques to determine how to shade this surface, one of which was invented by M. Phong. This is my personal favourite since it looks really good. We won't implement this technique for our 2D demo, but if you'd like to know more, go into altavista and search for Specular Highlights. This is what a cross section of the bump map looks like: 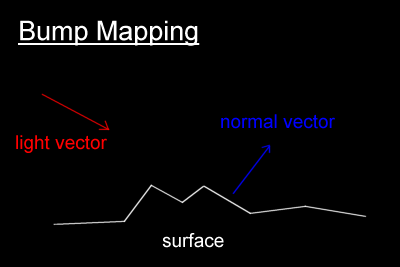 So you just need to know the position of the light, where it's facing, the orientation of the surface normal, and what to do with those vectors to get a shading algorithm for your surface. In this case that part of the surface would be pretty dark. That's the theory anyway. We'll try to apply that on a 2D bitmap, which makes things a lot easier for us. |
|
The Cheap Hack
|
|
To get this algorithm running quickly enough for a 2D software effect, we need to avoid all these operations on vectors. This is where simplification and hacking come into play. Here's the basic idea. We can shade the texture given the normal vector. But we can calculate the vector given the slope of the surface at that point. And getting the slope is just a question of calculating the difference between neighbouring pixels in the bump map. So in brief, we can shade the pixel in the colour map given the difference computed from the bump map. So given 2 differences, along the X axis and the Y axis we can find how intense the current pixel is. To do this we precompute a light buffer, like so:  This was generated by a simple equation that computes the distance from the centre to each pixel. The intensity of the light was faded linearly the further the pixel was from the origin. You could of course add some colour, and maybe even the Specular Highlights which you researched earlier. You can now shade each pixel given the two differences (also known as deltas) which you compute from the bump map. Here's the pseudo C++ code:
There a few things to explain here. Notice when both deltas are zero, the pixel at location (128,128) is fetched from the lightmap, which is usually 256x256. By taking a look at the light map just above, you will notice this is the most intense light. And the bigger the deltas, the darker the light will get. This is the case where our normal vector moves away from the light vector. Also notice we cannot compute the first column, or the first line since there are no neighbouring pixels in the bump map to compute the slope. Another hack we can add is to move the light around, by adding some time dependant value to the deltas. We can take into account the position of each pixel. Likewise we just add to the delta the coordinates (i,j). Yet another quick hack I've just thought of is to scale these coordinates by a time dependent variable to get a zoom effect. |
|
Grey Scale Modes
|
| I should have mentioned this last week, but i forgot :) You will notice that some of the sample effects I will provide run in greyscale mode. The main reason for this is simplicity. Last weeks distortion demo would run fine in 8 bit palettised mode as long as no bilinear filtering is performed. When you turn on bilinear filtering, you need at your disposition all the shades of colours between neighbouring pixels available. And this is not possible with palettised modes. That's why I opted for greyscale. Of course, I could have used true colour modes. All you have to do is repeat the exact same procedure on all three RGB components, there's no skill involved. But moving to true colour would either require me using VESA, or moving to Direct Draw. VESA is fine under DJGPP, but most cards usually support only high resolution modes, which are not ideal for demomaking: "Quality over Quantity". Direct Draw is good but I would have had to move to a windows compiler. But the whole point of this tutorial was to make it possible for anyone to compile the code, hence the choice of DJGPP. So in brief, don't expect a move to Visual C++ at all. Porting these effects to Visual C++ is easy anyway. Some people have told me they've successfully converted all the effects so far without any trouble. |
|
Look-up Tables
|
|
Even though some of our effects will be greyscale, most of the time we will be able to use clever techniques to emulate video modes with more colours. This is the main aim of look-up tables. Look-up tables (lut) are usually 2D arrays, that usually contain the original colours of an image, and shades thereof. So in the case of our bump effect, we store the original 256 colours of our background image, and 255 more shades of each colour. That's a lut of 256x256 that is prepared before we run the main loop. In our case, for each shaded colour we need to find the closest match in the palette, and store it's index. Now obviously the palette has to be chosen properly. It has to contain not only the colours of the fully lit image, but also the colours of shaded images. This was done by quantisation. Basically a quantization algorithm finds the optimal set of n colours to represent any image. So i just passed 16 shaded versions of the image to the quantisation algorithm, which did the reduction to 256 colours the work very well. I used the quant.c pluggin for The Gimp, which you can find here. You could also use Paint Shop Pro to create a huge image of 16 shaded versions of your original image, and then ask it to reduce the colour depth to 256. But that process seemed a bit too tedious for me, so i opted for the other method... Look-up tables obviously loose quality over true colour modes, but do pretty well in most cases: 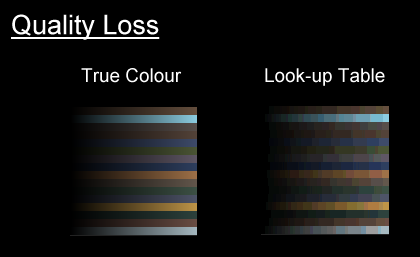 Those are the first 16 colours of a test sample I ran. You may be thinking why you need to learn about look-up tables, since everyone uses 16 or 32 bit modes anyway. Well luts are especially useful in 16 bit modes. As I said in a previous tutorial, operations on the separate colour components are tedious, hence the reason for precalculating them in small look-up tables. Make sure you don't make them too big cause they quickly become inefficient. |
|
About The Demo
|
|
I'm quite proud of this effect ;) All the bump effects I've coded in the past have either been slower, or not as good looking. The background image is a real image of Venus, except for the text of course :P Also note that I used a soften filter on the bump map, which often improves the quality of the effect. Now is a good time to point out that the overall quality of an effect primarily depends on how well you generate your data for it. In this case how good your background images are, how well your palette is created. Then and only then comes the quality of the code. Obviously standards need to be high in both areas for the effect to be outstanding. |
|
Final words
|
|
There are lots off different variations of bump effects. Believe me, i've seen my fair share, and most of them are not very original. Hopefully you'll be able to come up with exclusive ideas and impress us all... As for the look-up tables, i'm pretty sure we'll be using more of them in the future, so better get familiar with them right now. This tutorial is the one i've enjoyed the most so far, hope you did too ;) I'm still not quite sure what's going to happen next week. Probably something on zooming, but that's not a promise. Feel free to download this week's example with source code right here (184k) Enjoy, Alex |