|
The Art of Demomaking - Issue 03 - Timer Related Issues by (06 September 1999) |
Return to The Archives |
Introduction
 |
| This week's tutorial focuses on very important techniques for demomaking and game programming, mainly involving speed related problems and synchronisation. I was going to talk about all this later in the series, but it's so important that I'd rather explain all these problems now. |
|
Timing Devices
|
|
Unlike Einstein's theory, time isn't relative to the speed of your PC :) And that's one of the main problems with programming for the PC platform: different machines in different conditions will run the program at different speeds. And as a demomaker or game developer these are problems which you must face to make your program look and behave the same way whatever. One way of making sure of this is to have a variable that is incremented at regular intervals no matter what, just like a clock. All the calculations used to draw the frame must be of course based on that counter. That way the effect will look the same whatever the frame rate. There are various platform dependant methods of getting such a variable. Under DOS you can access a double word variable in memory that always contains the current time, and that is updated 18.2 times per second. You can also hook the timer interrupt, which means you can create a procedure that will be called regularly. In Windows there is a function GetTickCount() that also returns the current time in a long integer. Under Linux and WinNT you can create a special thread which does the same thing as the DOS interrupt hook. But how you get your timing device is irrelevant, the concept remains the same.
For the next tutorials, we will need some timing device capable of doing this in DJGPP. It turns out there is a nice unit called TIME.H that does most of the work for us. We just need to wrap it all up into a clean C++ object, and we're in business :) |
|
Frames Per Second
|
|
As most keen gamers will know, the FPS ratio is the average number of times a new image is displayed on the screen per second. High FPS, or at least above 30 is essential for game playability. But all the demos we will code will be non interactive. So how important is the FPS for us? To make an effect look the smoothest as possible, there should be a screen update for every screen refresh, that's about 60 FPS. In the old days of the amiga, demomakers would not release an effect unless it ran at one frame per retrace. Sure that takes a lot of skill and optimisation, but I seriously reckon that's a bit of a shame. I'd personally rather see an amazing effect at 20 FPS, than a good effect at 60 FPS. The fact that a demo is non interactive makes anything above 10 FPS acceptable. Anything below is not quite as enjoyable to watch. |
|
Dispelling the Myth of Precalculation
|
|
Precalculation is very important in demomaking, especially for making your effects run that much quicker. But some people just take it too far... I read a doc about BSP trees a while ago, and the author said something like: "BSP trees work on the same principle as sine tables, so if you haven't precalculated your sine tables yet, you're not ready for BSP trees." That makes my arse twitch, just by principle... Fair enough, for as long as I can remember, precalculation has usually had it's benefits. But the era where everyone precalculates absolutely anything is nearly over, or at least should be. For example, most next generation console chips will all have huge processing power. Relatively, their memory will be extremely slow. So for example, instead of storing a huge 4096x4096 landscape map, you'd save a couple of seed values, and an array of "would have been random" values. That way you can generate that landscape on the fly with fractals, at any zoom level. I bet you're wondering: "I program on a P266 MMX, what's this got to do with me?" Well, read on... I'll give you two examples. It doesn't really matter if you don't understand the details of these methods, it's the principle I'd like you to focus on. Firstly Sine tables: if you use the sine function a small number of times per frame, like to setup one camera matrix, it's not worth precalculating. Mainly because you'd need a huge table to get reasonable precision. But on the other hand, if you use a rotation matrix for each object you render, it probably would be best to precalculate your sines. Secondly Bilinear filtering: I was recently reading a message on comp.graphics.algorithms in which the author was proud to announce he had no multiplications involved in getting an 8.8 fixed point bilinear filtered value. He obviously had at least 256k of look-up tables... I started to chuckle to myself, only to realise that I would have done the exact same thing about a year ago :) It was only once I had coded both versions that I realised that the one with a minimal number of look-up tables was the most efficient. That was because I needed a bilinear value of 16 bits precision, but if you only need 4 bits precision of a 16 bit packed RGB pixel, then it's best to precalculate (as the Phantom would confirm). In brief, my advice is not to precalculate everything because people tell you to. The best thing you can do is experiment, compare, analyse the benefits and disadvantages of precalculation in each different case. |
|
Fixed Point Math
|
|
The advantage of floating point math is that you can work with reasonable precision at virtually any scale, but you pay a price for that: speed. Fixed point math works fine as long as you can put up with being limited to a certain range. The benefits being better execution time, like on the new Athlon which has 8 integer units against only 3 floating point units. So, how does fixed point work i hear you ask... Simple! Suppose that instead of using a whole 16 bit word to store the integer part of a number, we split that up. We can assign 8 bits for the integer part, and obviously 8 bits for the fractional part. You can also split any variable as you like, but this method has many advantages, including the fact that it is simply split into 2 bytes. So with this method, we can store a number with an integer part within the range -128..127 and with a fractional value that has 1/256th precision. Note that this method works just as well with unsigned numbers. 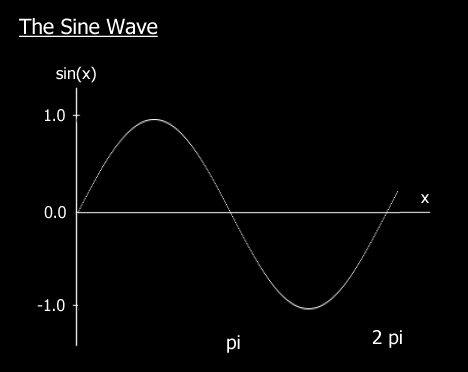 Additionally, conversion from fixed point to floating point, and vice versa, is quite easy. A is a fixed point integer, and B is a float.
Note that 256.0f = 2^8, because we have a 8 bit fractional part. Given those equations, basic binary operations on fixed point numbers are straight forward. Obviously C and D are also fixed point.
For multiplication and division, things get a little tricky. If we just multiply two 8.8 fixed point numbers together, we get a 16.16 fixed point value. So we must shift 8 bits to the right to revert to 16.8, and then simply truncate to 8.8. For division, we'd end up with a 16 bit integer with no fractional part, so we must shift 8 bits to the left to introduce the fractional part again.
The best thing to do to convince yourself of the gain of speed is to convert the example later in this tutorial to floating point. |
|
Interpolation
|
Given a number of arbitrary values, interpolation is a technique that enables you to find as many intermediary values as you wish. The easiest way to think of interpolation is with a graph. You have a series of values, one for each integer within a certain range. Now you may want to find the value corresponding to any float within that range. 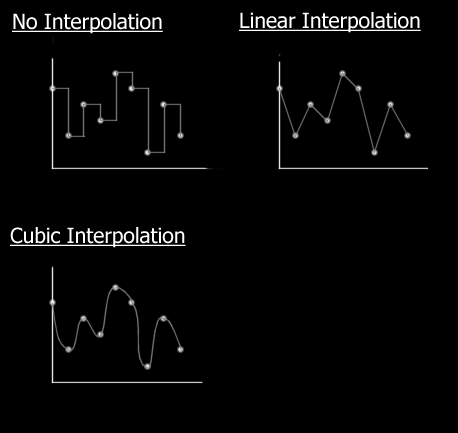 Note that there are many different kinds of interpolation techniques, the cubic method being the nicest, but most time consuming. The method we will use, linear interpolation, has the advantage of being simple and quick, and good enough quality in most cases. If you actually understand interpolation, programming it is the easy part. Say we have two values, A and B again, and we wish to find a intermediary value C. All we need is a blending coefficient k, which is always contained within the range 0..1. If the coefficient is 0, C has the value of A, and as k gets closer to 1, C becomes closer to B. This is translated by the mathematical equation:
You may notice that this equation is very similar to that of a line, hence the adjective linear describing the interpolation :) |
|
Cross Fading
|
|
The time has come to put all this knowledge together... Cross fading is simple yet looks good. The principle is you fade out an image, and simultaneously fade in the next one. And you guessed it, we need to interpolate in fixed point between the two images at constant intervals in time, with no precalculation. But I should have let you think a while longer about that last one :) This is a case where you could optimise your cross fading loop for SIMD instructions (MMX), and get much quicker results than by using any precalculated lookup table. You should have no particular difficulty in understanding the code. The only thing I believe requires an explanation are the RAW files. A RAW file is a binary file containing pure uncompressed information. No headers, or any other widgets, so they are extremely easy to load into memory. You can store anything you like in RAW files just as long as you remember what's inside! The 2 raw files provided are 320x200 greyscale bitmaps, one of which is a very old postcard of my hometown back in France. You can load them just as well with either Photoshop or Paint Shop Pro, and modify them at will. Download the demo with the source code right here (120k) |
|
Final words
|
|
Now we've got some important techniques under our belt, we can start to move onto more interesting effects next week, more specifically the famous plasma. I will also explain the sine function, and the theory behind per pixel control. Starting from next week, you will have to donate a large amount of cash into my Swiss bank account to get the rights to read the tutorials. No, just kidding! But any kind of encouragement for all my hard work would be appreciated :) Have Fun, Alex |