 |

Submitted by , posted on 06 March 2003
|
 |
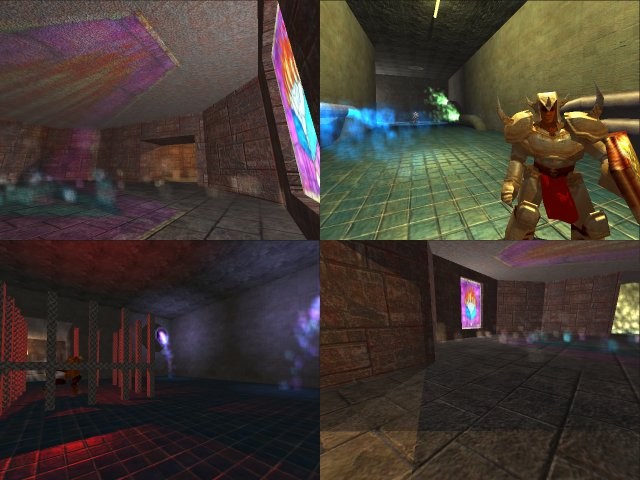
Image Description, by

"The Octagon" is my game engine project on which I have been working for the last 6 months, on and off. It displays Quake 3 bsp maps (including curved patches), Quake 2 md2 and Quake 3 md3 models. All are lit using per-pixel lighting and bump mapping, and all surfaces cast stencil shadows. It is written in C++ and uses OpenGL for graphics.
You may recognise this image as a similar one was displayed on the 26th of February. Unfortunately, the university network was down for 20 hours whilst the image was showing. Anyone who tried and failed to access my website should be able to visit it now.
The engine supports two classes of light, point lights and anisotropic light sources (with projective cube maps). Gross visibility testing is done using the bsp and frustum culling per sector. This is then refined by testing if each individual face is within the camera frustum. The same procedure is used to see which faces are lit by each light.
Firstly, everything visible is rendered with its decal texture multiplied by a small constant, plus its emissive texture, in order to provide the base for adding light. Then, for each light, stencil shadows are cast for each object which the light influences, and then the hardware-specific codepath lights the surfaces.
The engine currently supports three different codepaths, which are used to take advantage of the capabilities of the hardware on which the engine is running. Only the lighting calculations are dependent on the codepath used.
There is a standard codepath which uses only core OpenGL 1.3 features. This provides diffuse lighting in three passes per light.
The NV20 codepath uses ARB_vertex_program, NV_texture_shader, NV_register_combiners and EXT_blend_color to reduce the number of passes required on nVidia Geforce3 and above hardware. It also introduces specular highlights.
The R200 codepath uses ARB_vertex_program and ATI_fragment_shader, along with the 6 texture units available on Radeon 8500 and above cards from ATi to evaluate the entire lighting equation (diffuse and specular) in a single pass.
The geometry uses up to three texture maps for each surface. As well as the standard color map, each surface has an emissive map, and a normal map for the bump mapping. In the alpha channel of the normal map, the gloss map is stored. This is used to modulate the specular lighting to produce surfaces which are shiny/not shiny on a per pixel basis.
After all of the lights have been handled, particles which emit light of their own are added to the framebuffer. Then, we loop through the lights again and draw any non-light-emitting particles (such as steam particles), lit by any lights which influence them. If a light which is illuminating a particle system has a projected cube map, this is also taken into account, as can be seen by the stained glass window in the image.
If available, NV_vertex_array_range or ATI_vertex_array_object is used to increase vertex throughput. This does provide a benefit, but not a huge one since the major bottleneck is fill, not vertex transfer.
The demo and full source code are available from http://users.ox.ac.uk/~univ1234, where you will also find my other projects and my "simple bump mapping" tutorial.
|
|