|
Building a 3D Portal Engine - Issue 11 - 3D Portal Rendering by (12 March 1999) |
Return to The Archives |
Introduction
 |
|
Another week, another article. This week: 3D portal rendering, and ways to make it fast. Please note that you can now respond to the articles using the portal column message board, so if you have a question or a remark, write about it! Wow, I'm almost at the end of the list of subjects that I came up with in the very first issue of the portal column... that means that we have a problem. Well, not really, I guess I can write quite a few more articles on the portal stuff. But, nevertheless, help is needed! If you have some subjects that I could write about, or if you have a question that might require a little bit more than just a few lines of e-mail, let me know, I might just write an entire article about it! The first request already has been made: A dude who calls himself 'ROME' has requested some more information about '3D engine architecture'. Or, if you are a 3D coder yourself, you might consider to write an article as a 'guest column writer' - and I would get an entire week off! :) Anyway, back to the portal stuff. Two weeks ago I explained a bit about 2D portal rendering. The trick was to adjust the 'clipping window' so that sectors beyond portals are clipped against the outlines of the portal. This technique requires quite some clipping in most cases, especially if you're rendering at high resolutions. The clipping operations themselves are quite simple, so the algorithm works fine. But, you might ask yourself, there must be a better way... and of course, there is. Just like in nature, things get interesting when you leave the 2D space, and advance to 3D space, or way beyond... but that's beyond the scope of this column. As you may recall, a clipping window can be represented using four planes, organized in a pyramid shape. In that case, I wouldn't call it a 'clipping window' anymore, since that suggests that we're still working with something flat. The 'pyramid shape' is called a 'field of view', or a frustum. Just like the 2D clipping window, the 3D frustum volume can be adjusted when a portal is encountered. This is what I call '3D portal rendering'. So, how do we implement this? Let's start with the original frustum. A frustum can be represented by planes. So, the minimal frustum consists of three planes, but that's a rare case. The frustum that you will start with is a volume with four boundary planes. Planes are represented by plane equations, of the form:
A little C++ class structure:
The plane that represents the left side of the screen could for example be:
Which means that you can fill in any value for y: There's always a combination of x and z that makes this a valid equation. X and Z are linked, as the plane extends to the left (in 3D space) as you get further away from the camera. Of course, finding this '-1' and '1' by hand is hard, especially when you want to build arbitrary volumes. So, we need a nice function for this. I already presented such a function in the culling article; The algorithm accepts three coordinates, and constructs the correct plane for them. So, for the plane on the left side of the screen, you simply feed it the top-left coordinate on the screen at a slight distance from the camera (e.g., x=-320, y=-200, z=-256 for a 640x400 display), the bottom-left coordinate (e.g., x=-320, y=200, z=-256) and the camera position (0, 0, 0). Do the same for the plane on the top side of the screen, the right side, and the bottom. The four planes now represent your frustum. A frustum can internally best be implemented using a linked list, since you'll need to store an arbitrary number of planes in it. Or you could use this structure:
Disadvantage here is that you have to specify the number of planes you intend to store in the frustum when you create a new instance. The frustum that you now have can be used to clip polygons against. To check if a point is 'in' or 'out' this volume, simply fill it in the equation: For example, if you're curious whether (-200, 500, -200) is in or out, calculate:
Meaning that it is exactly on the plane. Bad example. :) Anyway, if the calculated distance is greater than zero, consider the point 'in'. If it's smaller than zero, it's 'out'. Revert to the clipping document if you want to know what to do with polygons. So, what should you do when you encounter a portal polygon? Well, you should first clip it against the frustum. If it's completely clipped away, you don't have to draw the scenery behind the portal, if it isn't, you have to adjust your frustum. To do this, use the CLIPPED portal polygon, and create new planes from the camera to the edges of the portal polygon. So, if you encountered a square portal polygon and clipped of one corner, so you got a five sided portal polygon, the new frustum would consist of five planes. With this new frustum, the sector behind the portal can be processed. OK. Now that we have the frustum construction and adjusting clear, let's summarize the portal rendering algorithm:
So, here you have 'world's simplest approach to unlimited world rendering': Since sectors beyond portals are never visited, they don't cause delays or require processing in any way. If you would place your portals in such a way that the resulting 'rooms', or 'sectors' (as I call them), or 'cells' (as Crystal Space calls them) are all convex, you can guarantee that you have zero overdraw. Have a look at this picture: 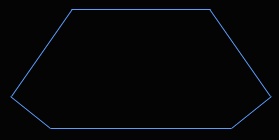 fig. 1: Convex Polygon This is a convex room, because you can't draw a line that starts in the room and ends in the room, that is somewhere outside the room. Here's a concave room: 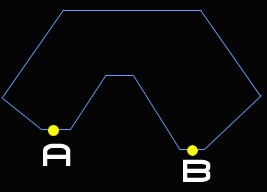 fig. 2: Concave Polygon Now you can draw a line from A to B that is partially outside the room, so it's concave. A sphere is a convex 3D object, a sphere with a hole is a concave 3D object. A cube is a convex 'polyhedron', and so is a pyramid. The good thing about convex rooms is that you can draw the polygons that define the room in ANY order without having to worry about sorting. And since portals are also part of the room, you don't have to worry about sorting when you do perfect portal rendering. So, how do you place portals automatically, so that ANY scene can be rendered with this gorgeous simple algorithm? Well, here's our first problem. You wouldn't want to do this, and it's hard to do this. The first point: You don't want to do this, because an average level would cause numerous portals to be generated. Numerous portals means lots of clipping, which may not seem to be a problem, but it might be slower than just accepting the overdraw. So, there's a trade-off. Consider the following example: A very simple room, with 6 polygons (i.e., a hollow cube). In the middle of this room there's a floating sphere, consisting of 200 polygons. How many portals do you think you would need to divide this room in convex subspaces? LOTS. And every portal is used to clip the walls and the sphere against... It's quite obvious that you need a special case here. The other problem that I mentioned is that it's hard to find these portals. Maybe by hand you can easily find the portals needed for the scene I just described, but how do you make this automatic? It's a disaster. The best thing that I could think of so far is 'tetrahedralization and joining', wich means that you first apply the 3D version of triangulation to your scene (triangulation of a polygon means subdividing it in triangles, sir Delaunay found a nice algorithm for that), after which you can probably join some tetrahedra into larger convex polyhedra. Another solution is using a BSP tree. Consider this scene: 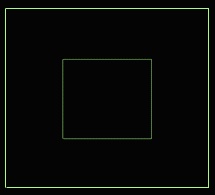 fig. 3: Room With A Pillar The best placement of portals looks like this: 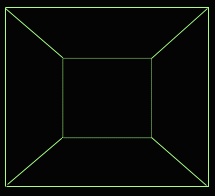 fig. 4: Optimal Portal Placement A BSP tree would do something like this: 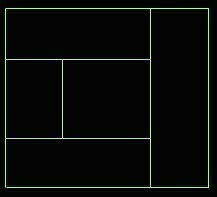 fig. 5: Room With A Pillar We still have four polygons on the floors and ceiling, but this time the BSP algorithm caused splits in the walls. That's a pitty. But the algorithm IS automatic, and that might be important. This article is getting quite long, so I think I better stop here... Next week, I'll discuss some other ways to use portals in a less pure way, so that they don't need so much clipping anymore, and are better suited for hardware rendering. These basics will be important at a later stage, when I discuss shadow rendering using pure portal tracing. |